
Originally posted by Modern-Day Ma on April 22, 2020

The aspect of sourdough I love the most is its ability to make a true, sour, crusty loaf and its ability to rise soft, pillowy dough that turns out sweet and flavorful. This recipe gives you the best of both worlds. It makes enough for 2 loaves and you can alter your technique slightly by allowing one or both of the loaves to rest in the refrigerator overnight to increase the sourness of the final bread. Bake them off the same day for an amazingly tasty, not-so-sour result. Can’t decide? No worries, just bake one of each!
I can’t stress enough that this is a bread formula and method, not a standard recipe. The hydration level of the dough directly determines the results and can only be achieved with careful measurements (ahem, weights). If you still don’t have a reliable kitchen scale that measures grams, now is the time to invest in this necessary tool. (while I love and use the scale linked above, this one is amazing for just a few more Benjamins.) In the meantime, bake this recipe instead.
Sweet or Sour Artisan Loaves
For all you math/bread geeks (like me) the formula for this loaf is 30% starter, 29% water, 40% flour, and 1% salt.
406 grams lukewarm water
560 grams flour (84 grams wheat or rye and 476 grams bread or all-purpose flour)**
14 grams salt (fine-grained Real Salt, pink Himalayan, or sea salt are best)
Directions
Build your levain if you don’t have freshly-fed starter that has been fed at a 1:1 ratio.
In a large mixing bowl, combine water and levain and stir to mix (use a Danish dough whisk if you have one)
Add flours and mix well. Your dough will look wet and lumpy. DO NOT ADD SALT YET.


- Line a banneton or medium-sized mixing bowl with a banneton liner or half of a flour sack towel (yes, cut your flour sack towel in half “hamburger style”). Sprinkle liberally with flour.


- Perform 2nd and final shaping using the pictures below as a guide. Tension leads to the best shape and crumb in your final loaf.
 Hang the dough just enough to elongate it slightly.
Pull the top “corners” out into Micky Mouse ears, being cautious not to tear the dough.


- Repeat with the sides of the dough.


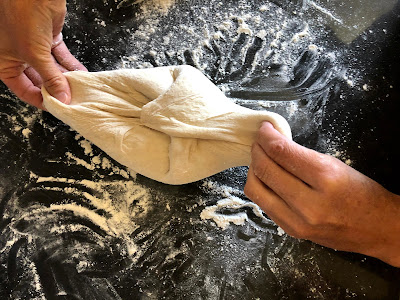


- Carefully place dough, seam-side up in the lined banneton or bowl, and sprinkle and smooth more flour over the top. Cover with the other half flour sack towel.


- ***For a more sour loaf, with great crumb structure, allow the loaf to sit at room temperature for about 20 minutes and then put it into the refrigerator for 24-48 hours. Remove loaf from the fridge about 30 minutes prior to baking.
- Place an enameled cast-iron dutch oven with lid in the oven and preheat to 500° F for 30 minutes. You want the dutch oven and lid very hot. If your oven is a scorcher, then preheat to 450°. If you don’t have an enameled dutch oven, you can use a stainless steel heavy-bottomed stockpot with a lid. Be sure both pot and lid are oven safe. (Do NOT use nonstick cookware)
- Once the oven and pot are preheated, the dough should have doubled in size. Very gently, invert the dough onto an 11×17 sheet of parchment (mine is misted with spray oil).
- Using a lame, or a new clean razor blade, or a very sharp knife, slash the dough at a 45° angle in whatever pattern you choose.


- Using caution and pot holders, immediately remove the lid from the dutch oven and using the parchment as a sling, lower the loaf into the pot. Replace the lid.


- Close oven door and lower the temperature to 400° F.
- Bake, covered for 45 minutes, then remove the loaf from the pot, discarding the parchment, and place it directly onto the oven rack for approximately 5 more minutes, or until crust is golden (or dark) to your liking.

- Remove loaf from the oven and cool on a wire rack. Do NOT slice into the loaf when it is hot. The interior crumb is still going through changes and solidifying as it cools. If you cut into it while it is hot, the center of your loaf will have a gummy texture.
- Loaf baked the same day:

 Loaf baked the 2nd day:
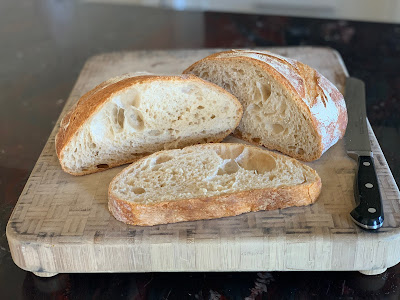
 Loaf baked the 3rd day:
- Once cooled, enjoy your loaf with plenty of butter.
 *If you are new to sourdough or just aren’t sure if your starter will work as the levain in this recipe, please read this post.
 - **You can use all white flour here, but most people find that a little whole-grain flour exponentially improves the flavor of their bread.
- ***There are three choices for baking your loaves. Choose to bake your loaf either the same day, the next day or the 3rd day.


Comments
Post a Comment